Streamlined Steps for Developing an App: From Concept to Implementation
productivity09-10-2024

Defining Clear Steps for Developing an App: From Concept to Implementation
Moving away from your laptop and mapping out your app idea on paper is crucial for clarity and success.
Taking the time to write down your app development goals and steps can significantly influence your project’s trajectory. Often, people dive straight into coding without a clear plan, which can lead to frustration and wasted time. Let’s explore a more effective approach: take a step back, outline your vision, and implement it systematically. Here’s how to break it down.
Step 1: Define the User Journey
Start by stepping away from your laptop and envisioning the user’s interaction with your app. Consider the specific problem it addresses and identify your target audience. Write down your thoughts to create a clear user journey that will guide your development.
Think of the user journey as a narrative that describes how users will engage with your app from start to finish. List the key stages users will go through, from discovering the app to completing their desired actions. This foundational understanding serves as your North Star, guiding your decisions and keeping the user experience at the forefront.
Having a clear user journey is like having a map. You know the starting point, the destinations, and the various paths users might take, making the project feel more manageable and focused on user needs.
Step 2: Outline Key Touchpoints
Next, break down your user journey into actionable touchpoints. Identify the essential components of user interaction, such as:
User Goals: What do users want to achieve at each stage? User Actions: What steps will users take to reach their goals? User Experience: Sketches or wireframes of the interactions at each touchpoint. Feedback Loops: How will users receive feedback and confirmation throughout their journey? By defining these elements, you create a straightforward plan that lays the groundwork for an organized implementation, ensuring that each touchpoint serves a distinct purpose in enhancing the overall user experience.
Step 3: Simplify Execution and Iterate
Finally, simplify your approach by breaking down the user journey into manageable tasks. Focus on creating a seamless experience by addressing core user needs first and writing down the necessary actions for each touchpoint. Whether developing a prototype, a personal project, or for an employer, always prioritize the user’s experience. Plan, break down, and create.
Example:
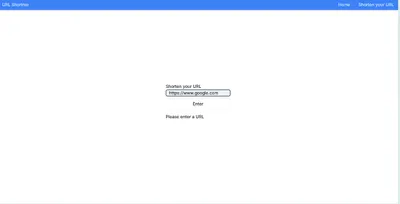
Here is an exmaple of me developing a simple URL shortner app with Remix using the method above.
First. What is the plan. Well first, I think: A User Submits a URL into an input box. Then it gets converted… this would most likely be done on the backend. Then the shortURL is shown but links to the LongURL. I write the steps down. I break it down into steps based on key user interactions, and on what the backend/frontend will do. Then I code.
So, I need to:
-
User Discovery and Access User Action: The user arrives at the app’s homepage. User Goal: To find a tool that allows them to shorten a long URL quickly
-
URL Submission User Action: The user sees an input box where they can enter a long URL
<Form method="post" className="flex flex-col">
	<h1>Shorten your URL</h1>
	<input
		type="text"
		name="longUrl"
		placeholder="URL"
		id="name"
		className="px-3 border border-1 rounded-md"
	/>
	<button
		type="submit"
		className="inline-block transition-all mt-2 p-2 border border-1 rounded-md hover:bg-blue-200"
	>
		Enter
	</button>
</Form>
User Goal: To input their long URL into the app.

-
Form Submission User Action: After entering the long URL, the user clicks the submit button. User Goal: To send the long URL to the backend for processing.
-
Backend Processing Backend Action: The submitted URL is sent to the backend server for conversion.
export const action = async ({ request }: ActionFunctionArgs) => {
	const formData = await request.formData();
	const longURL = formData.get('longUrl') as string;

	try {
		// Check if URL is valid
		new URL(longURL as string);
		const shortURL = generateShortUrl(longURL);
		console.log(shortURL, longURL);
		return { short: shortURL, long: longURL };
	} catch (error) {
		throw new Error('Not a URL');
	}
};
Backend Goal: To generate a short URL from the long URL using a defined function.
-
Response Generation Backend Action: The backend creates a short URL and sends both the long URL and the short URL back to the frontend. Backend Goal: To provide the user with the newly created short URL.
-
Displaying the Short URL
User Action: The app receives the response and displays the short URL as a clickable button or link.

<Form method="post" className="flex flex-col">
	<h1>Shorten your URL</h1>
	<input
		type="text"
		name="longUrl"
		placeholder="URL"
		id="name"
		className="px-3 border border-1 rounded-md"
	/>
	<button
		type="submit"
		className="inline-block transition-all mt-2 p-2 border border-1 rounded-md hover:bg-blue-200"
	>
		Enter
	</button>
</Form>;
{
	actionData?.short ? (
		<a href={actionData.long}> {actionData?.short}</a>
	) : (
		<p>Please enter a URL</p>
	);
}
User Goal: To easily copy the short URL or use it to redirect to the original long URL.
-
Conclusion
This user journey illustrates the seamless flow from user input to the backend processing and finally back to the user with the desired outcome: a short URL that links back to the long URL. By following this structured approach, you can ensure that each step is focused on enhancing the user experience and functionality of your app.


